Leatherworking is an ancient craft that dates back centuries, with some of the oldest leather artifacts being discovered in the tombs of ancient Egyptians. Not only is leatherworking a rewarding and enjoyable hobby, it also offers an array of useful benefits. From creating beautiful custom leather items to upcycling old leather goods, leatherworking can be both a creative outlet and an opportunity to create practical items. Whether you are just starting out or are a seasoned leatherworker, this tutorial will provide helpful resources to guide you through the basics of leatherworking.
In this tutorial, you will learn the different tools and supplies needed to get started leatherworking, including leather cutting tools, leather dye and finish, and leatherworking machines. You will also discover the basics of leatherworking, from how to pick the right leather for projects to different leatherworking techniques. With the help of this tutorial, you will be able to craft beautiful and durable leather items for yourself or for others. From wallets and belts to bags and briefcases, you will be able to create a variety of quality leather items. So let’s get started and explore the world of leatherworking!
Types of Leather
Leather is a unique material that has been used for centuries for a variety of purposes. It is a durable material that is both aesthetically pleasing and incredibly versatile. There are a variety of different types of leather available, and each one is suited for different applications.
Overview of Different Types of Leather
The three main types of leather are full-grain, top-grain, and split leather. Full-grain leather is the highest quality of leather, as it is made from the top layer of the hide and has not been sanded, buffed, or snuffed. It is the most durable and has a natural look and feel. Top-grain leather is made from the second layer of the hide, and has been sanded and buffed to remove imperfections. It is still quite durable and has a slightly more processed look and feel. Split leather is made from the lower layer of the hide and has been split into multiple layers. It is the least expensive type of leather, but it is not as durable as the other two types.
Which Types are Best for Certain Projects
The type of leather you choose for a project will depend on the intended use. For items that need to be very durable, such as furniture, full-grain leather is the best choice. It is also the best choice for projects that require a natural, unprocessed look. Top-grain leather is a great choice for items that need to be durable, but don’t need to look natural, such as bags and jackets. Split leather is the best choice for projects that don’t require a lot of durability, such as upholstery and clothing.
How to Choose Quality Leather
When selecting leather for a project, it is important to choose a high-quality hide. Good quality leather will have a uniform color and texture, with no blemishes or marks. It should be soft and supple, and have a natural, slightly waxy feel. It should also be free from any unpleasant odors. When selecting leather, it is best to choose a hide from a reputable supplier.
Leatherworking Techniques
Cutting and Shaping Leather: Cutting and shaping leather is the initial step in leatherworking. It involves using a sharp knife or blade to cut the leather into the desired shape and size. Depending on the complexity of the project, a leatherworker will use a variety of tools, such as an awl, a mallet, a leather punch, and a rotary tool.
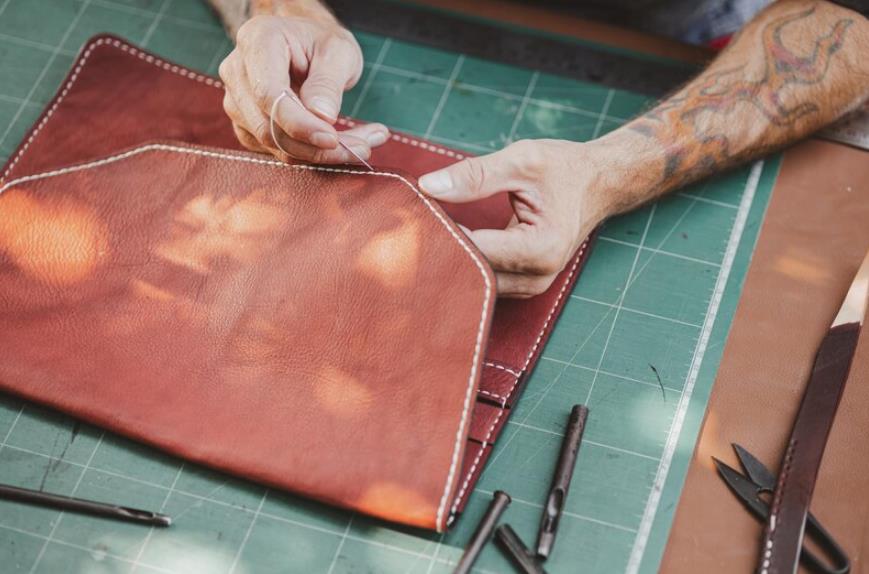
Sewing and Stitching Leather: Once the leather has been cut and shaped, it is time to begin stitching. Sewing and stitching leather requires the use of specialized tools, such as a leather needle, a leather awl, and a thimble. The leatherworker will use these tools to create various stitches, such as whipstitching, saddle stitching, and lacing.
Tooling and Stamping Leather: Tooling and stamping leather is a process that involves using various tools and stamps to create patterns, textures, and designs in the leather. The most common tooling and stamping tools include a mallet, a swivel knife, a beveler, a veiner, and a variety of stamps.
Dyeing and Finishing Leather: After the leather has been cut, shaped, stitched, and tooled, it is time to begin the dyeing and finishing process. This involves using a variety of dyes and finishes, such as aniline dye, spirit dye, and oil-based finishes. The leatherworker will use a variety of techniques, such as sponging, rubbing, and brushing to achieve the desired results.
Crafting Leather Items
Leatherworking is a traditional craft that has been around for centuries, and it can be a great way to make beautiful and unique items for yourself or as gifts. There are many different types of leatherworking projects, from simple keychains or bracelets for beginners to more advanced projects such as wallets, belts, handbags, and even footwear.
For beginners, the simplest projects require little more than a few pieces of leather, some basic tools, and a bit of patience. A few simple tools are essential for most leatherworking projects, such as an awl, a cutting knife, and an edge beveler. With these tools, leatherworkers can create items such as keychains and bracelets with relative ease.
Intermediate leatherworking projects may require more specialized tools and more intricate patterns. For example, wallets, belts, and handbags may require more intricate stitching and more exacting attention to detail. Additionally, more advanced projects may require a greater variety of tools and techniques, such as burnishing and edge beveling.
Finally, advanced leatherworking projects such as footwear require both a high level of skill and a great deal of patience. Footwear projects often require a wide variety of specialized tools, such as leather punches, edge bevelers, and eyelet setters. In addition, the leatherworking process must be carefully followed in order to create a high-quality pair of shoes or boots.
Troubleshooting and Tips
Common Mistakes to Avoid in Leatherworking
- Not preparing the leather properly before beginning work. This includes letting leather pieces dry completely, sanding down any rough spots, and cleaning the leather with a damp cloth to remove any dirt or dust.
- Not taking the time to plan out the project before beginning. This includes having a clear idea of what the end goal is and what tools and materials are needed.
- Not using the correct tools for the job. Different tools are needed for different types of leather, and it is important to make sure the correct tools are used for the specific job.
- Not having the correct measurements before beginning. Taking the time to measure and mark out the leather before cutting or stitching will help ensure a professional finished product.
- Not testing the finish before applying. Test out any finishes, dyes, or stains on a scrap piece of leather before applying it to the finished product.
Tips for Achieving a Professional Finish
- Take your time and be precise when cutting, stitching, and finishing the leather.
- Use a quality leather conditioner and cleaner to keep the leather looking its best.
- Use an edge beveler to create a professional looking edge on the finished product.
- Use a quality thread and needles to ensure that the stitching is strong and durable.
- Take advantage of tools such as a leather punch, edge burnisher, and awl to make the job easier and achieve a better finish.
How to Care for Finished Leather Items
- Store the leather item in a cool, dry place away from direct sunlight or heat.
- Clean the leather regularly with a damp cloth to remove any dirt or dust.
- Use a leather conditioner or leather protectant to help keep the leather looking its best.
- Use a leather sealant to help prevent water damage and staining.
- If any repairs are needed, make sure to use a leather specific patch or glue to ensure a secure and professional finish.
Resources for Leatherworking
Recommended Books, Websites and Blogs for Learning More About Leatherworking
Leatherworker.net – One of the most comprehensive websites for leatherworking information, featuring a large database of tutorials, forums, and more.
The Leathercraft Handbook by Chris Haines – A comprehensive guide to leatherworking featuring detailed instructions and step-by-step illustrations.
Tandy Leather Factory – This website provides a wide variety of helpful leatherworking resources, including instructional videos, articles, and an online store.
Leather Crafters Journal – A blog dedicated to leatherworking featuring helpful tutorials and tips.
Leathercraft Library – A website offering a range of leatherworking books, videos, and patterns.
Suppliers for Leather and Leathercraft Tools
- Tandy Leather Factory – This website offers a wide selection of leatherworking tools and supplies, including leather, dyes, and hardware.
- Leather Craft Supply – An online store offering leatherworking tools and supplies, such as leather, hardware, and dyes.
- Leather Hide Store – An online store offering a wide selection of leather hides and skins, as well as leatherworking tools and supplies.
- The Tannery – An online store offering a selection of leatherworking tools and supplies, including leather, hardware, and dyes.
Local Classes or Workshops for Beginners
Tandy Leather Factory – This website offers a variety of classes and workshops for beginners, such as Leatherworking 101 and Leather Tooling Basics.
Local Leatherworking Clubs – Many cities have leatherworking clubs which offer classes and workshops for beginners.
Local Art Studios – Many local art studios offer leatherworking classes and workshops for beginners.
Local Leatherworking Shops – Many local leatherworking shops offer classes and workshops for beginners.
Conclusion
Leatherworking is an incredibly rewarding craft, and it’s never been easier for beginners to get started. With the right tools, some practice, and a little bit of patience, anyone can craft beautiful and quality leather items. We’ve gone over the basics of leatherworking, including what tools you’ll need, the importance of choosing the right leather and hardware, and how to go about cutting and stitching your leather pieces. We’ve also discussed some of the most popular leatherworking projects, such as wallets and belts, and the different types of edges and finishes you can use to really make your items stand out.
It’s time to put your skills to the test and give leatherworking a try! Whether you’re looking to make a gift for someone special or just want to try your hand at a new craft, leatherworking is a great place to start. There’s no better feeling than being able to turn a piece of leather into something beautiful and unique. So get your tools and materials ready and get ready to create something amazing!
When you’re done, don’t forget to share your leatherworking projects on social media and show off your newfound skills. With a little bit of practice, you’ll be a master leatherworker in no time. So get out there and start crafting your own leather creations!
FAQs – Crafting Quality Leather Items
1. What tools do I need to start leatherworking?
The basic tools to start leatherworking include an awl, leather shears, leather punches, a leather skiver, edge beveller, and an edge slicker. You may want to add an edge beveller, a leather groover, a leather strop, a stamping tool, and a leather sewing machine to your toolbox.
2. What type of leather is best for leatherworking?
The type of leather you choose will depend on what type of items you plan to make. Generally, veg-tanned leather is best for crafting items that require strength, such as belts and wallets, while chrome-tanned leather is better for items that require some flexibility, such as gloves and bags.
3. What leatherworking skills should I learn first?
The first skills to learn when starting leatherworking are cutting leather, skiving leather, and basic leather sewing. Once you have mastered these skills, you can start to try more advanced techniques, such as embossing, stamping, and tooling.
4. How do I protect my leatherworking projects?
Once your leather project is finished, you will want to protect it with a leather protector or sealant. This will help your project stay looking its best for years to come.
5. How do I finish my leatherworking projects?
After you have completed your leather project, you can finish it by applying a leather dye or finish. This will help to bring out the colors and texture of the leather and will also help to protect the leather from wear and tear.
6. How can I get started with leatherworking?
The best way to get started with leatherworking is to take a class or read up on the basics. You can also purchase leatherworking tools and supplies to get started.
7. What is the difference between veg-tanned and chrome-tanned leather?
Veg-tanned leather is a type of leather that is tanned using vegetable matter. This type of leather is known for its strength and durability and is often used for items that require strength, such as belts and wallets. Chrome-tanned leather is tanned using chromium salts and is known for its flexibility and softness. It is often used for items that require flexibility, such as gloves and bags.
8. What is the best way to clean leather?
The best way to clean leather is to use a leather cleaner that is designed specifically for leather. You should also use a soft cloth or brush to gently scrub the leather.
9. What is skiving leather?
Skiving leather is the process of thinning down the edges of a piece of leather to make it more flexible and easier to work with. It is an important skill for leatherworking and can be done with a leather skiver.
10. How do I store my leatherworking tools and supplies?
It is important to store your leatherworking tools and supplies in a cool, dry place. You should also make sure that they are kept away from direct sunlight and moisture to prevent them from rusting or corroding.